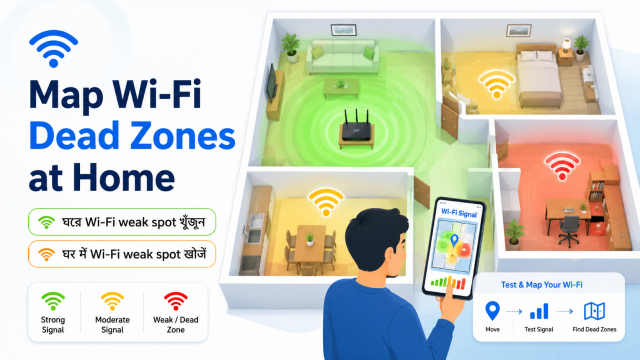
Quick answer: Test the same phone, same server or app, and similar time in each room. Record signal bars only as a rough clue; also test webpage loading, a short video call and repeated speed results. The map helps you identify patterns, but it cannot guarantee a specific internet speed.
Affiliate disclosure: This article may contain affiliate links. If you buy through them, JoLLy KA Tech may earn a commission at no extra cost to you. Product suggestions are based on suitability, safety, warranty and value—not commission. As an Amazon Associate I earn from qualifying purchases.
সহজ কথায়: একই ফোন ও একই পদ্ধতিতে প্রতিটি ঘরে পরীক্ষা করে কোথায় Wi‑Fi দুর্বল বা অস্থির তা মানচিত্রে লিখে রাখুন।
आसान भाषा में: एक ही फोन और एक ही तरीके से हर कमरे में परीक्षण करके नक्शे पर लिखें कि Wi‑Fi कहाँ कमजोर या अस्थिर है।
Project time: 30–60 minutes • Difficulty: Beginner • Best for: Flats, multi-room homes and router placement decisions
What the map will tell you
A dead-zone map shows where performance changes inside your own home. It can reveal a weak corner, a floor-to-floor problem, interference near appliances, or a router placed behind thick obstacles. It does not separate every possible cause, so compare Wi-Fi results with the internet speed available near the router.
What you need
- A rough hand-drawn floor plan
- One phone with Wi-Fi enabled and mobile data turned off during testing
- The same speed-test service or router app for every location
- A pen and three symbols: good, usable and poor
- Optional sticky notes for temporary room labels
Prepare a fair test
- Restart only if you are troubleshooting a clear temporary issue; do not restart between every room.
- Stand near the router and run three tests. Record the middle result rather than only the highest.
- Note the Wi-Fi network name and band if your router displays separate 2.4 GHz and 5 GHz names.
- Pause large downloads and streaming on other devices where practical.
- Use the same phone orientation and hold it at roughly the same height in every room.
Test each important location
Choose real-use spots: the sofa, study desk, bed, kitchen table, balcony door and any smart-TV position. At each spot, wait around 20 seconds after arriving, then record the result.
- Signal indicator: strong, medium or weak
- Three speed tests: write the middle download and upload result
- Stability: did the number change sharply between tests?
- Real task: load a normal webpage and make a short voice or video call
- Latency clue: note delays, buffering or repeated reconnection
Use simple colours or symbols
- Green circle: normal everyday tasks work reliably
- Yellow triangle: browsing works but calls or video may struggle
- Red cross: repeated disconnection, very low speed or no connection
- Blue star: important location that needs improvement first
Try free changes before buying hardware
- Move the router into the open and higher than floor level.
- Keep it away from thick metal objects, closed cabinets and large appliances.
- Test a more central location if the internet cable allows it safely.
- Rotate or position external antennas according to the router manual.
- Update router firmware using official instructions.
- Retest only the red and yellow locations using the same method.
Do not run long network cables across walking paths without proper cable covers. Do not place the router where it can get wet, overheat or be pulled down by its cables.
When hardware may help
If the router area is fast but distant rooms remain poor after better placement, compare an extender, mesh system or wired access point. A second product is not automatically the answer: wall material, home layout, backhaul method and device compatibility matter.
Affiliate-friendly recommendations
Natural product categories include a longer certified Ethernet cable, cable covers, a small router shelf, mesh Wi-Fi, an access point or an extender. Link to a buying guide that explains trade-offs rather than placing a shopping button before the diagnosis.
Keep a before-and-after record
Write the date, router position, plan speed, phone model and test method on the map. This turns a vague “Wi-Fi is bad” complaint into evidence you can compare after moving the router, changing a plan or contacting the provider.
Frequently asked questions
Are Wi-Fi bars accurate?
They are a rough indicator and may differ by phone. Combine them with repeated speed and real-use tests.
Should I use 2.4 GHz or 5 GHz?
2.4 GHz often reaches farther, while 5 GHz can provide higher performance at shorter range. Actual results depend on the router, device, walls and interference.
Will an extender always fix a dead zone?
No. An extender placed where the original signal is already poor may repeat a weak connection. Placement and backhaul quality are important.
Why is Wi-Fi good but internet slow everywhere?
The issue may be the broadband connection, plan, provider congestion, modem, router load or a large download. Test near the router and compare a wired test when available.
Sources and further reading
- Google Home Help: Where to place Wi-Fi devices
- Google Home Help: Improve Wi-Fi speed and performance
- JoLLy KA Tech: Best Wi-Fi router placement for an Indian home
Important: Device designs, app menus and manufacturer instructions can change. Check the manual for your exact device before using cleaners, stands, chargers, storage products or accessories.